Main Page

Friday, August 26, 2011

KAWASAKI 96-03 ZX-7R ZX7R MODS


Some interest in the Kawi forum for my Old bike (ZX7R 97) front & Rear mod which involves the ZX10R forks & Swingarm . Do drop me some comments if you want to read more about this mod...attached some pictures of the end result of the mod.

Thursday, August 25, 2011

Trying out some decals


Toying around with some decal ideas for the ER6N, did some mock up for the side shrouds with a black colored decal tribal theme. Wanted to add some more black to the overall red highlights. Always looking for the balance of Black & Red.

Also did some work on the MT03 headlights, adding a Red 1 cm outline to the rim of the headlight.
Thinking of Blackening the Headlight mountings to create the 'Floating" headlight effect. Question is the method of executing it, Decal or by spray painting ?

Monday, August 22, 2011

Part 4 - Putting it all together

Been putting off documenting the last part of the front end mod too long and was reminded by one of the forumers that Part 4 was missing (thanks Douglas) . So all the parts are already in hand (BOQ as listed below)
1. 04-05 ZX10R fork (1 pair) c/w Shaft & Spacer
2. 08 Versys Lower Triple
3. 08 Z1000 Upper triple
4. Zx14R Nissin Caliper
5. 07 ZX6R Front Fender
6. Omnia Racing (Italy) Street Fighter headlamp (MT03) c/w brackets

Now the parts are sent over to Jing Sheng from our local Superbike Specialist at Sunny Cycles to put them all together. the initial objective was to utilize the ZX10R lower triple that came with the fork but later decided to Ream out 2mm from the fork clamp of the Versys Lower Triple after seeing that that less effort needs to be put in for the following:
1. Steering stop position was identical to the ER6N
- Steering stopper needs to be added if ZX10 lower triple was used
2. Steering Stem was Identical in length to the ER6N
- Steering stem needs to be Hydraulically pressed out and swapped with the Versys/ER6N if ZX10R lower triple was used
3. Plenty of material at the Versys Lower triple to accommodate the 2mm removed at the clamp to install the 54mm ZX10R fork.

Hence my initial effort of Mirror Polishing the ZX10R lower triple was in vain..but later found the black finishing of the Versys fork to esthetically look better then the polished ZX10R lower triple.

Day 1-7
The Reaming of the Versys fork took about a week as the Machinist had some difficulty in completing the task due to the shape of the triple which has a non linear shape for clamping to a Lathe machine.

Day 8-9
After the Versys Triple had returned brom the machine shop, the rest of the assembly was quite easy, just ha
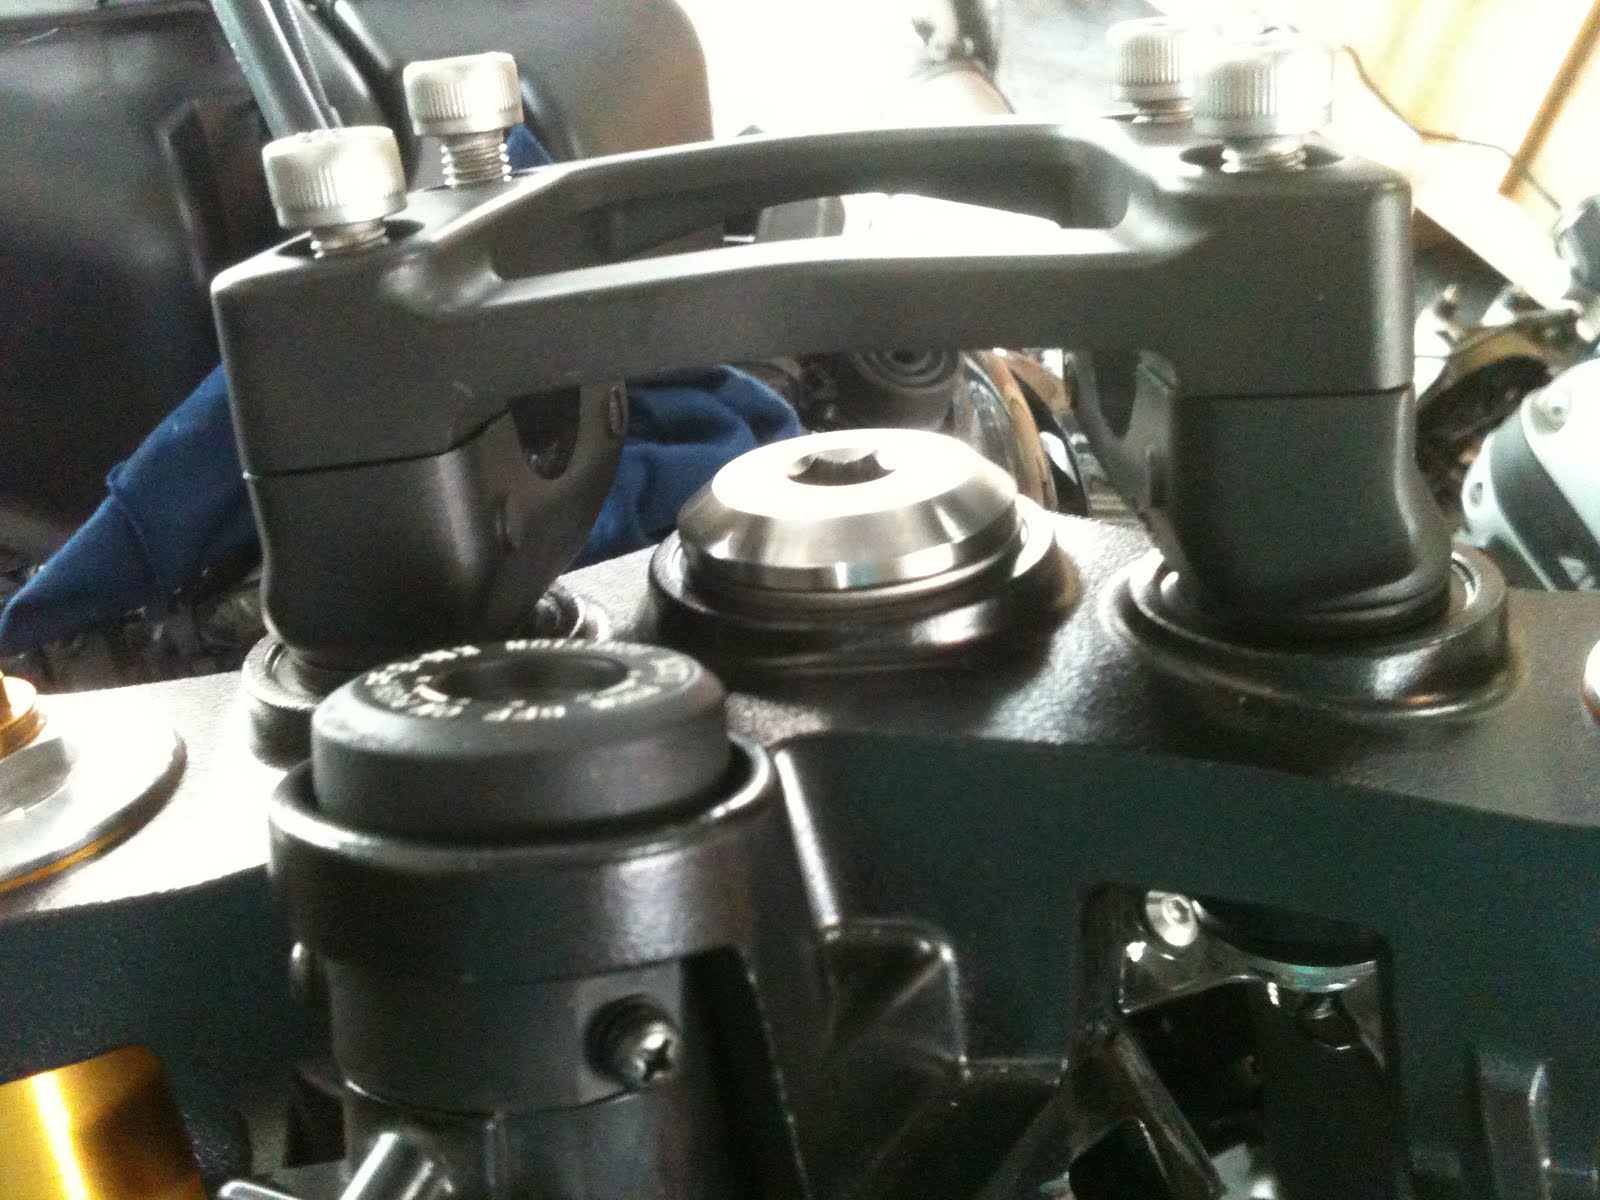
ving to bolt on the Lower clamp to the ER6n frame , sliding the fork in and installing the Z1000 upper triple (ignition was earlier grinded out from the ER6n upper triple before bolting on the Z1000 triple). Was glad to find out that the Ignition stop position of the ER6n & Z1000 was identical as researched earlier. The handlebar Stop of the versys also lined up with the ER6n Frame without any alteration. ZX10R fork fits just nicely within the Side Shrouds when the handlebar was turned to the extreme left and right (Someone had told me earlier that the Zx10R fork cannot be used as it will get in the way of the shroud-glad to find out that its not) with about 3-4mm to spare.


Next the Zx14R caliper was bolted on the fork and the Er6n wheel (with the rotors still installed) was installed. I had the option of having 2 sets of Spacer (ER6n & ZX10R) to try and was quite sure that either one could work. Sure enough the ZX10R spacer was a perfect fit and Wheel, Rotor & Caliper lined up perfectly with just the installation of the brake hose to complete the brake install.

Finally the Omnia Racing MT03 headlights was installed but prior to that the brackets need to be fabricated to mount the Headlights, a lower position was selected to give the Er6n a more hunkered down look in contrast with the rest of the other Er6n Mods that uses the MT03 headlights which mounted the headlights at a upper position (Nearer to the upper triple). Most mods which objective was to create a Super Moto type of Er6n will have a high position headlight mounted and the meter (OEM or custom) to be relocated usually behind the handlebar in oppose to the OEM position in front of the handlebar. The OEM meter mounting was used with some slight changes (Cable management routes were removed) to speed up the whole process.

The whole assembly & bracket fabrication took merely 2 days to complete after the machinist had completed the reaming of the lower
triple, in total the entire process took approximately 9 days.


Sunday, August 21, 2011

Blue Xenon Bulbs on the ER6-N


Many have asked me of the possible usage of the Blue Xenon Bulbs on the ER6-N and the clear answer is yes its possible to utilize the Blue Xenon Bulbs on the ER6-N without effecting the Voltage rectifier of the motorcycle but the right bulb must be chosen. The right configuration would be 12V & 55/60W, I am currently using the 5000K light temperature type of bulb . DO NOT install the 100W type of Xenon bulbs as they will damage your electrical system of your motorcycle. I am using the MT03 headlamp which is using the H4 format bulbs but if you are using the original headlight for the ER6-N 09-10 then it would be the H11 type of bulb. The Blue Xenon Bulbs claimed to be 60% brighter then OEM halogen bulbs and is more friendly on the plastics of the headlight as it removes the plastic damaging UVA (long wave -Ultraviolet A) light.
Oh By the way, I am also using a Blue halogen auxiliary bulb for the added blue effect.

Thursday, August 18, 2011

ER6-n World Wide

Hi all, just noticed that there are many visitors to my Blog from the States, Europe, Spain & South America besides visitors from my own country Malaysia. Particularly thanks to Ankarius the Admin for the Spanish Kawa forum ( http://www.kawaner6s.es/forum/index.php?showtopic=34434&pid=593283&st=0&) for the humble mention of my Blog. Maybe you guys could share what are the usual mods done in your own country and maybe a link to a picture of your ride. I do collect pictures of ER6-n which i find unique.

Wednesday, August 17, 2011

Resolving Handle Bar vibration with the Rizoma Handle Bar plug.

Handle Bar Vibration has always being a bane with all ER6n owners. ER6n Engine being a Parallel Twin employing a 180 degree crankshaft. This results in an uneven firing interval (180 degrees, 540 degrees) which gives the engine note a distinctive "throbbing" quality does not help.
After doing the ZX10R fork upgrade and replacing the stock handle bar clamp & conical handlebar unit to a Rizoma make does help ease the vibration a tad but without a weighted handlebar cap, a significant amount of wobble can still be felt when riding in the mid RPM range.
Hence I had decided to go for the Rizoma Handle bar cap (MA512G G model for gold colored) rated at 65 grams each. After mounting them on, vibration was not noticeably reduced hence I had to do some alteration to further improve the anti vibration capability of the Bar cap. From past experiences with adding after market handlebars, stock handlebar caps which are great vibration dampers will not be usable. Stock caps are usually much heavier and mounted to the handle bar via an threaded mount at the end of the handlebar using a M8 bolt whereas after market handlebar caps are usually mounted using an expandable rubber bush with a M6 bolt.
The strategy was to increase the weight of the Rizoma cap without compromising its look and integrity. Upon closer inspection of the MA512, I eventually came up with the idea of replacing the original 20mm bolt with a 30mm bolt, this replacement will also give me an option to slip in a few 2mm thick M6 washers to act as weight ballast until the handlebar vibration is no longer felt. I ended up using 4 units of the 2mm thick M6 washers before any vibration was noticeable. Design of the MA512 gives you the capability of this mod as it is hollow to house the mounting bolt before the delrin slider is screwed in to cover this hollow recess. Illustration shows a stack of washers threaded into the 30mm M6 bolt right before i screw it in the rubber bushing.

Monday, August 8, 2011

Welcome to HEL - Custom Steel braided brake hose.

HEL - One of the few available custom steel braided brake hose in Malaysia. Some literature pertaining to the history of HEL extracted from their website .

The History Of HEL Performance

Hose-Equip was established in 1985 as an authorized Aeroquip distributor and quickly gained a reputation in the Industrial, Marine and Hydraulic marketplace for a friendly approach to both quality and service. This developed into them becoming an authorised MOD contractor and an ISO9000 quality assured company. Quality is at the fore front of what we are as a company today. In 2000 the company was acquired by the current owners for the sole purpose of targeting the performance fluid transfer marketplace. The name was changed to Hose Equip Limited and the HEL Performance brand was born. The now world famous Devils Tail logo was commissioned and the brand was launched.

My setup was done by Sunny Motor in Jalan Pahang. Length of the brake hose is custom cut as my setup is non standard due to the combination of Z1000, ZX10R & Versys components which made up my front end. Braking now is more precise and the previous mushy feeling during hard braking is no longer felt. 1 finger braking is now possible even with my stock ER6n Nissin Axial Master cylinder. Furthermore HEL provides the option to select from 8 stunning colors, Red was chosen for my ride to compliment the RED black theme i have going for the ER6-nR


Flower Power - Review of Pre Load Adjuster from Devil Components


Review of the Petal shaped PreLoad Adjuster for ZX10R fork from Devil Components (Italy). The finishing and the detail of this preload adjuster is just magnificent. every corner is painstakingly rounded and the ergonomic shape is just right providing enough torque to turn the fork preload adjuster with just 3 fingers. The adjuster is secured onto the fork with a stainless steel screw which is embedded into the adjuster. A spare set of hardware is also provided. Precision of the adjuster is commendable as there isn't any wobble or vibration detected for speed up to 140Km/h.

Sunday, August 7, 2011

Rizoma Tapered Diameter Handlebar Review


Just installed the Gold colored Rizoma Tapered Diameter Handlebar onto the ER6nR with a 30mm rise. First ride on the bike with the "Fatbar" gives an impression of a more relaxed hand position with a generous degree of handlebar sweep as compared with the Pro-Taper handlebar I was previously using. Mild vibration is still felt on the grip at high speed. Guess I will still need weighted Bar End Plugs to reduce the Vibs.

Wednesday, August 3, 2011

Just created the er6n-modification Google group

Just created the er6n-modification Google group to discuss all aspects of ER6n / F & 650R modification at http://groups.google.com/group/er6n-modification

Blog Kawasaki ER6N Malaysia: Forum ER6N Baru

Blog Kawasaki ER6N Malaysia: Forum ER6N Baru: "Yes, ianya terus berkembang. Abang Ahmad telah membuka satu Forum yg khusus kpd ER6N owners, berkonsep 'dari ahli kepada ahli', membolehkan ..." Good Job Abang Ahmad, hope that this forum will promote the use of the ER6-n in malaysia and further unite the users.

Cervelo P2C - A dream realized

Every since my school days owning and riding a Time Trial Bike has been my dream. The dream became a reality last year when I chanced upon a used Cervelo P2C on ebay from a seller in the States. Viewing from the pictures he provided, the frame looks to be in very good used condition. Only drawback was it did not come with the proprietary Custom seat post that is unique only to the P2C. Initially I was hesitant to bid but fate has it that at that time a seller had a brand new P2C seat post for sale as well. I was quick to snap up the sale via buy it now and proceed to bid on the 51cm frame. Eventually manage to outbid the other bidders and procured the frame. 3 Weeks later the frame was in hand.


So far the P2C had experienced a Triathlon event at the Kenyir International Triathlon and it performed commendably bringing me back to T2 with a time of 1:22:20 with an average speed of 30km/h

Tuesday, August 2, 2011

ER6n-R Mod - Front End Mod - 2 Day Ride Review


Second day commuting with the ER6n-R (R for Race mod) to work and found the bike to be handling better then when the bike was running with the standard 41mm Telescopic fork. The bike seems to be absorbing the bumps and jolts from the road better then before. Noticed that I was not bobbing up & down so much while riding across the uneven surfaces especially on secondary roads & bike lanes around KL. The Fast & Slow speed dampening capability of the ZX10R fork is amazing. Initially I was concerned how the ZX10r fork initially designed for a bike which is nearly double the horse power capability of the ER6n would behave. Eventually feeling more confident after realizing that the weight similarities of both the bike (Er6-n at 178kg to Zx10R at 170kg) and found the Er-6 to be 8 kgs heavier then the Zx10r probably due to its steel swingarm & trellis frame. The 43 mm inverted fork with top-out springs from the ZX10r would in fact benefit the handling of the ER6-n due to its full adjustability & stiffness of the Kayaba fork.

Monday, August 1, 2011

ER6n-R Mod - Objective and Direction

The ER6-n was first introduced in Malaysia in 2006 as a CBU (Complete Built-up Unit) which means that the bike is a fully imported completely assembled vehicle and is subject to Import Taxes by the local government agencies. It was retailing for about RM50+ thousand ringgit malaysia at the time. Being a middle weight parallel twin motorcycle with aprox 70+hp with a price tag of a locally made car was not very appealing to the local bike guys. It was not until 2009 that Kawasaki Sunrock (Local Kawasaki franchisee) decided to assemble the ER6-n locally making it a CKD (Completely Knocked Down) hence was exempted from certain Taxes & Duties that made the ER6-n stand out from the the other 600cc bikes as its cost nearly half or its original CBU price. The other competitors such as the Suzuki Gladius retails about RM10K more then the ER6-n.
As a seasoned rider having been riding since my high school days, my previous bikers were:
- Suzuki Panther 150 - 1987
- Kawasaki KRR 150 - 1990
- Yamaha Virago 400 - 2002
- Kawasaki ZZR600 - 2004
- Kawasaki ZX7R - 2006
- Kawasaki ER6-n 2011

Guess you can say that I am a Kawasaki Guy...but the local support for the brand is commendable. Even today you could get spare parts locally for a 1995 ZZR600. Good Job Kawasaki Sunrock !
Here are some pictures of my previous ride..the legendary ZX7R P2 which has been modded with a front and rear end of a ZX10R.

My first ride on the ER6-n was an eye opener for me. Never did I ever think that a 600cc bike would handle like a 250, guess the advantage lies with the narrow width of the parallel twin config presented by the Er6-n engine. Having braved the KL traffic on a daily basis previously with the Monstrous ZX7R, riding the ER6-n was a breeze, even able to keep up with the mopeds & scooters.
But the ER6-n was not a totally perfect machine. Having being built as a entry level budget sports bike, designed to appeal to a wide-ranging audience from newcomers to seasoned riders. The initial nagging weaknesses in the earlier versions were frame weakness. Owners had complained of a Frame crack near the area where the radiator mounts to the frame. The frame weakness was addressed by the 2009 version with a few re-enforcements at the weak joints. I am riding the 2010 version of the bike and I can't help but to notice that the suspension of the bike is screaming for an update. The front has a standard 41 mm telescopic fork, 120 mm (4.7 in) travel and the rear comes with a single offset lay down shock w/adjustable preload; 125 mm (4.9 in) travel. My research on the web shows that the most cost effective improvement was just to swap the internals of the 41mm fork with the Top of a SV650 fork and that will give you at least a Preload Adjustment at the top of the fork.
However I decided to go for the Zx10R fork swap option which i will be documenting in detail further in my blog.
I am doing these mods to the ER6n as a Technology update on the ER6n as I intend to keep the bike for some time. With these updates you will be able to ride the bike for at least another 5 years (no matter what kawasaki comes up with in 2012) as they will definately not upgrade the ER6n to such a Technology level as its intended as a budget entry bike

Kawasaki ER6n-R ZX10R Front End Mod Part 5 - Selecting The Headlight

So far the main components of the ER6-n front end mods have been selected, now is the time to choose the headlight. The selection will determine if the bike eventually looks like a plain old naked bike just like any other thousands of ER6-n out there OR a mean looking StreetFighter that the bike was intended to be. Initially my choice was the BMW Lo-Rider look with the dual Projection Lamps stacked one on top of the other but reconsidered after finding out the sheer weight of those lamps. Eventually headed down the path of the MT-03 headlights which is used by the German Streetfighter mod powerhouse - LSL Motorradtechnik.
googleb7197f8cf44aaff3.html