

Blog on my various modding journey
Tuesday, December 27, 2011
Monday, December 26, 2011
Red Head is in.....
Powder coated Red colored head cover installed with the Pair valve hole covered by aluminum welding. Noticed the popping sound when bike is throttled down had disappeared completely. he secondary butterfly valve had also been removed to increase the airflow into the throttle body. This yields a significant throttle response with a crisper feel.


Tuesday, December 20, 2011
Hepco & Becker engine guard in da house
Hepco Becker engine guard on board. Powder coated red to emphasize the color contrast. Could finally put the fugly Delrin slider to rest. Head cover powder coated red to follow soon.


Wednesday, December 7, 2011
Radial Master cylinder
After the recent Genting ride, it is discovered that the OEM axial front master cylinder of 14mm is not suitable to handle the Nissin Radial Calipers. An opportunity arise where My Mechanic and friend has a spare Radial Master cylinder off his newly purchased GSXR1000 K9Monoblock with 16mm piston and is willing to part with an attractive price with an additional CRG adjustable lever. An additional Rizoma Brake fluid reservoir was also added as the new MC works on an external Reservoir system.


Monday, December 5, 2011
Page View ...new all time record..
Yipee... thanks to all the viewers, the WebDC's Blog has achieved a all time high of 103 viewers yesterday.

Saturday, December 3, 2011
Streetfighter ride up Genting Highlands today...
Great ride today with Nik & gang up Genting highland via the old trunk road (Genting Sempah). Feels good hitting the twisties after laying off about 3 years. Some of the guys had video cams mounted so will upload movies if its available. Bike handling was amazing through the super tight twisties of genting sempah, handling the bumps and the tight corners with ease compared to the ZX7R ii previously rode through this route several years back.


Wednesday, November 30, 2011
180/55 5.5 wheel upgrade update
Still feels damn solid after aprox 105km done on the bike. Had to lay off 2 clicks from the Ohlins Shock Rebound & Compression Damping adjustments probably because the BT016 has a softer compound compared to the OE tires.
Sunday, November 27, 2011
180/55 tires on the ER6N
Decided to convert the rear from a 4.5 to a 5.5 wheel. This is made possible with the TWF Racing ZX6R conversion kit. The kit consists of 3 spacers and some milling job done on the sprocket carrier. A new Wheel from a ZX6R/636 (Mine is of a 05-06 636) is also needed for this mod. Tires look nice and fat now so far improved ride handling can be felt with improved corner entry & exit speed probably due to the bigger contact patch between the tire and the road. Definitely not a placebo effect.


Monday, November 21, 2011
RED LCD for your ER6N Speedo anyone?
Before shot---yellow LCD


After Shot..RED LCD
Remember to remove the cover of the Speedo first.....as seen below
 Took it out for a ride and the minus point is the glare that is introduced by the film because its a glossy surface. Maybe difficult to see clearly in direct sunlight. Need to look for a matte surface film next maybe in blue.
Took it out for a ride and the minus point is the glare that is introduced by the film because its a glossy surface. Maybe difficult to see clearly in direct sunlight. Need to look for a matte surface film next maybe in blue.Sunday, November 20, 2011
New Decal Graphics
Started fooling around with some decals for the bike's graphics. Used the ORACAL 951 Premium Cast Film- Light Red 032 decal. The ORACAL 951 is a premium cast vinyl film which is outdoor rated for 10 Years durability. Dabbled with some designs for the rear, side & tank graphics. Pictures below


Thursday, November 17, 2011
Front End Clean Up
After moving the speedo up to the handle bar, there was a big gap previously taken by the speedo where the cables can now be seen. I have fashioned a piece of the CF panel that was used for the heel guard as a kind of 'Head tidy' as a opposite from 'Tail tidy'. Pictures can be seen below


Wednesday, November 9, 2011
Rizoma Tomok Mirrors
Added the Tomok Mirrors and the Gold colored adjustable clutch & brake levers from BIKERZ. Tomok mirrors has a good rear view angle and does not wobble when the bike is revved to high RPMs.

Latest Picture of the bike...


Latest Picture of the bike...


LED lights
Added a wedge connector 6 Blue colored LED bulb to the headlight. The brightness of the compound LED is just amazing adding safety to the bike when its seen on the rear view mirror of cars.


Monday, November 7, 2011
Handle Bar Mounting The Speedo Meter
Long Weekend in Malaysia was spend with Family and spare time fabricating a Handle Bar mount for the ER6n Speedo. Idea was conceptualized after the launch of the 2012 ER6n where the newly launched ER6n has the speedo mounted on the handle bar. Mounting a speedo on the handlebar is nothing new, bicycles speedos have been handlebar mounted since 80s (Cateye) but a motorcycle speedo is significantly bigger and heavier. Hence a beefier mount is needed, so the journey to rummage through the internet to find a mount that will do the job commenced. Eventually found a mount from Kuryakyn that looks sturdy enough for the role.  Next was finding a method to adapt Kuryakyn mount to the ER6n Speedo. A Carbon Fiber adapter was finally fabricated from the leftover material used for the Heel Guard project that was completed 2 weeks ago. Quite happy with the end result of the Mod as the bike cockpit now looks neater with the entire frontal area 'opened up' , bike stance looks meaner as well.

 Next was finding a method to adapt Kuryakyn mount to the ER6n Speedo. A Carbon Fiber adapter was finally fabricated from the leftover material used for the Heel Guard project that was completed 2 weeks ago. Quite happy with the end result of the Mod as the bike cockpit now looks neater with the entire frontal area 'opened up' , bike stance looks meaner as well.
Next ...I was thinkin of fabricating a windshield from a left over ZX7R double bubble unit that i have in the store room. This is to close up the 'Gap' previously taken by the frontal mounted speedo.


Tuesday, November 1, 2011
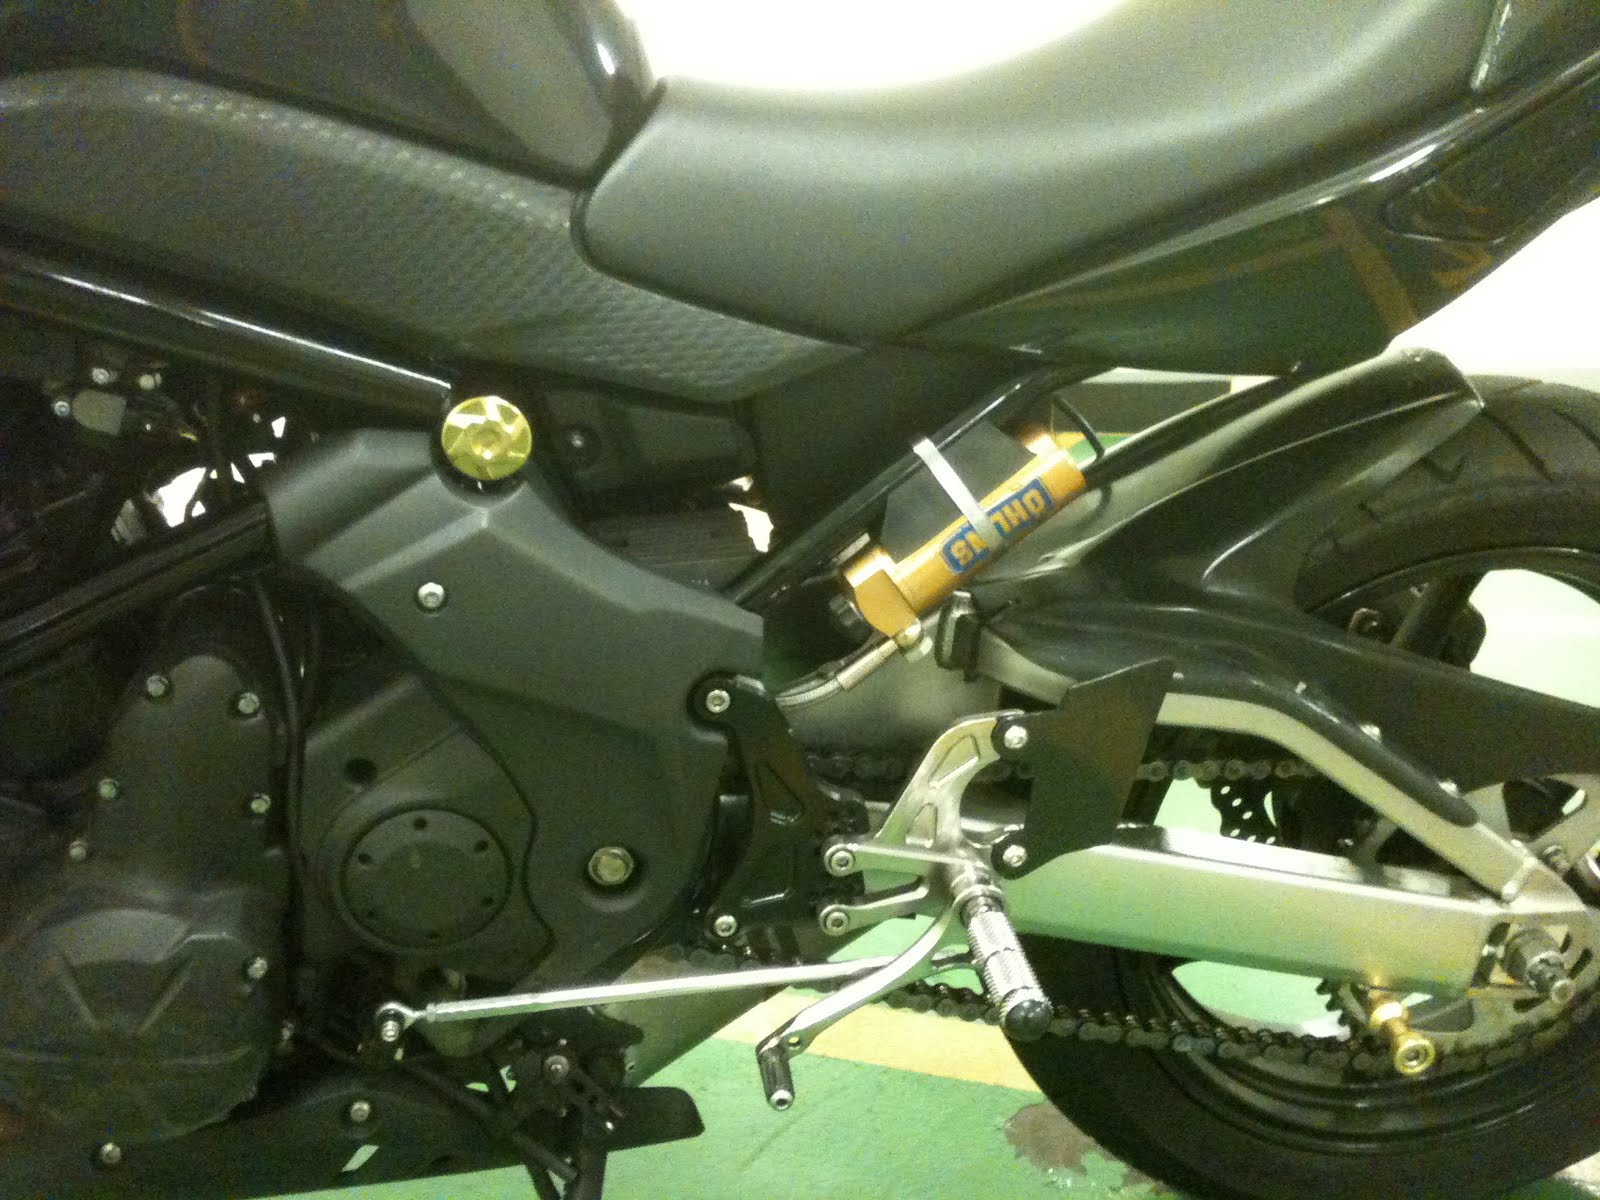
Öhlins H0115 in a ER6N Part 2 - Its finally installed
 Finally after 3 weeks in the shop for complete refurbishment which include replacement of all seals, oil & steel braided hose.The H0115 shock meant for CBR 600 from Öhlins is finally installed on the ER6N, appeared that the 140 Spring rate meant for the F4 is suitable with my weight (70kg) configuration. Amongst the modifications needed to mount the H0115 on the ER6n is as follows:
- Mounting holes needs to be enlarged from an M10 to M12
- Öhlins Spacers needs to be milled thinner to fit the Versys swingarm mount.
- Standard Spacer M12 (2 X 1mm) needs to be added for the frame mount.
Now the rear of the bike is 5mm taller giving the bike a steeper Rake and a shorter Trail. Bike now feels sharper and faster when entering corners.
Comparison between the 2 Öhlins shock absorber kit
KA 602 for Kawasaki ER-6 AND the Öhlins shock absorber kit
HO 115 for Honda CBR 600
Set-up data for KA602 (ER6n)
Shock absorber length 290.5 mm
Shock absorber stroke 56.5 mm
Spring Pre-load 8 mm
Rebound damping 16 clicks
Setup data for H0115 (CBR600)
Shock absorber length 290 (+12/-0) mm
Shock absorber stroke 51 mm
Spring Pre-load 10 mm
Rebound damping adjuster 8 clicks
Compression damping adj. 10 clicks
As you can see the H0115 has a variable length (+12/-0) mm meaning it could be lengthen another 12mm longer and it has an additional Compression Damping capabilities.
The damping capability of the bike feels amazing, immediately noticeable the moment you ride the bike. Bumps and potholes gets soaked up by this amazing shock. From the pictures you could see that shock mounted right way up instead of the upside down config of the KA602 (Öhlins shock for the ER6n) this orientation is chosen to compensate the routing of the steel braided hose of the Compression Damping Canister which is mounted on the left side of the bike with a rubber base and a stainless steel clamp.
Tuesday, October 25, 2011
New Paddock bobbin / Slider installed
Just installed a new set of locally made Paddock bobbin / Slider. Looks good with a clean gold anodized finishing.Comes with a nice transparent box packaging. Easy to install with a M10 X 75mm bolt. Product is value for money and with a quality CNC finishing.


Wednesday, October 19, 2011
Racing Rearsets with DIY Carbon Heel Guard
Just installed a racing rearset which I manage to obtain a used set for a very attractive price. Decide to make it a dual tone color scheme and customize the heel plate/guard from a piece of 3mm thick Carbon Fiber panel. The CF panel is quite tedious to cut as it is very stiff. Stiffer then most of the plastics I have handled on my rotary tool. Had to add a 2 mm washer to the heel plate before I bolt it on so that it will clear the Versys swingarm.

The following is the Right side

The following is the Right side

Sunday, October 16, 2011
New Decal graphic for Single Seat Cowl
Grew tired of the old graphics for the single seat cowl and decided to DIY a new scheme following the side shroud grahics.


Saturday, October 15, 2011
Ninja 650R Side Caps


Thursday, October 6, 2011
ZX10R hugger mod

Fancy having the ZX10R hugger for your ER6n ?....
IMHO the ZX10R has one of the nicest hugger on a sportsbike. Been wanting to include the hugger on my ride for quite a while now since the ZX7R actually. So finnaly got the chance to get one off the bay for a reasonable price. The trick was to mount the 10R hugger onto the Versys swingarm which has a different dimension & mounting points. Finally the most feasable route was to splice the Versys hugger to the ZX10R hugger..literally. Went about getting a Versys hugger (locally manufactured) mounted and subsequently placing the 10R hugger to identify the best way of splicing the two together. Discovered that there are a few mountable point that the 10R hugger could be joined to the versys unit this was done by placing the 10R hugger on top of the Versys hugger. Tried using a 2 Part fast setting epoxy resin initially but an accidental drop test proved that this method alone was not strong enough for the mod. The two parts immediately separated upon contact with the concrete floor from a 3 feet drop. I eventually went with a Rivet & epoxy method eventually. The 10R hugger is now joined to the Versys hugger by 8 reivets at 4 important stress points ( 3 at the swingarm mount points and one at the tip of the hugger). Did another drop test and to my relieve it survived this time around. Dremmeled the joint areas to smooth it out and will eventually cover the entire unit with a layer of 3K Carbon Fiber cloth to hide the imperfection. Will use the time waiting for the arrival of the CF cloth to road test the hugger for weaknesses.

Wednesday, October 5, 2011
Versys swingarm FAQ
- The OEM foot pegs clears the Versys swingarm quite nicely with the 1 cm spacer installed, the pegs seem to be in line with the swingarm and evenly spaced out (looks as though its been made to fit (with spacer installed.
Tuesday, September 27, 2011
Ohlins H0115 in a ER6N
Next .. getting a Ohlins H0115 (From CBR600 F2) mounted and sprung for the ER6N....
Update:
140 Spring rate is way too hard for the ER6N. Since the YSS springs are of the same ID & OD as the Ohlins, might be using the YSS 95 or 100 Springs for replacement. BTW, I am a 71 Kg rider without gear. Manage to find this Spring Rate chart from the Kawiforum. Still trying to figure out how to effectively use it.

Versys Swing Arm upgrade
Stay tuned..Versys swingarm upgrade in progress. Latest update...the ER6N rear axle thought to be too short is incorrect. Actual situation is that it is too long. A versys rear axle now needs to be purchased for the upgrade.
Work in progress pictures...
Everything bolted on..took only <1 day for the tech guys (Jing Sheng) to mount everything on. No modification, only added spacer for the right OEM foot peg (Race Rearsets have yet to arrive).


Notice the Axle protruding, ER6N axle appears to be too long...looks like some spacer will need to be added while waiting for the new Versys axle to arrive.
This picture shows the rearset spacer added to clear the swingarm

Some updated Pictures after the bike has hit the roads...initial 5 KM ride to the office..I could not feel any difference as the bike was upright most of the time. Height is identical with the ER6N Absorbers in place. Will need some twisties to put the swingarm to test. In addition to the Swingarm mod, the nozzle of the Akrapovic slip on was also removed for a fiercer look.

ER6-N with a slippery Clutch ?
Apparently the ER6-N can be equipped with a slipper clutch (also known as a slider clutch or back-torque limiter). Very technical discussions with the Race prep guru's at Sunny Moto revealed that the Slippery clutch from a ZX6R 05-06 or ZX6RR 03-04 could be used as they share the same Basket architecture. A spacer would need to be fabricated to ligate the ZX6R basket to fit the ER6N system. The parts diagram attached below shows both the ZX6R & the ER6N clutch digram side by side to show the difference in configuration. Will provide more updates once the 05 ZX6R clutch basket arrives and the project is on its way.


Friday, September 23, 2011
Chinese ER-6...?
Just read an article from VisorDown's website about a Chinese Bike manufacturer CF Moto that had just released a 650cc parallel twin machine that closely resembles the ER6-N. Even the layout of the engine components and the frame look identical. Quiet impressive is the dual level seat that even Kawasaki is yet to make available to the ER6-N, 2012 version of ER6-N maybe....?


Thursday, September 8, 2011
Gear Change Upgrade - EK9 Shift Linkage

After suffering continuous issues with the EK4 shift linkage , I had decided on replacing it with a Civic Type R Shift linkage assembly. Installation is merely a 30 minute affair. The Type R linkage appears to be more sturdy with a larger diameter tubing and a sturdier link assembly. The throw feels shorter and gear shift feels more precise.
Subscribe to:
Posts (Atom)